Showing posts with label Home Decor. Show all posts

Thursday, April 19, 2012

For the boys...

I found this vinyl saying at a store a few months ago and knew I needed to find a place in my house for it. I love my 2 boys...I am hopeful that they will always love each other and want to spend time with one another.

I finally decided to put the saying, with a picture of the 2 of them, just outside their bedrooms...I hope that it becomes a little reminder for them each day.


It's amazing how much it "warms" up our little hallway by the bedrooms!

LOVE it!

Wednesday, February 29, 2012

Picture collage

Putting holes in the wall to hang pictures stresses me out.
I don't want to put any hole in wrong...cause then well, I'd have a hole in my wall.
I laid out all my pictures on the living room floor and then stared at it for a week.
stress I tell ya!

I finally decided to just put them up.
I traced the frames (all from Ikea) onto some old crappy wrapping paper and taped them up on the wall. Then started measuring, moving, remeasuring and putting in nails.

This is what I ended with.

aside from pictures, I made one of these date things (seen all over Pinterest).

and to fill a space to small for a frame but too big to leave empty,
a big vinyl T.

I really do like how it turned out.
I wish I could get a better picture of my pictures.
but this is the best I got!


Friday, January 6, 2012

My sister's family room wall collage

While I was in Seattle, my sister decided to "employ" me to help her do a mini makeover of her family room. It's kind of been a funky room to figure out what to do with. There's a tv in the room, but no couch. There is a desk (a table we painted to make a desk) that never gets used...and my nephew's toys. She wanted the room to be more of a family room and a place that she and her 9 year-old son could hang out, watch movies, and just chill.

We ditched the table on the street corner with a free sign on it
(it was gone before 9am the next day).
She bought herself a couch.
And we put up a picture collage to make the room feel more warm and inviting.

All of the smaller frames were ones she had.
We bought the larger frames and then sprayed everything brown.
To mix things up...we covered the backing of one of the frames with that super cute fabric, put a blue "J" and a vinyl saying on the wall too.

I really love how it turned out.
I think we may even add a small shelf on the far right side under the picture of their hands.

Now she just needs to switch out some of the older pictures and add some to the empty frame.

As for the rest of the room...
we hid the toys behind the couch.
Left her book shelf where it was, but added a fabric covered frame thing with some clips attached to display some of my nephew's art (that kid LOVES to draw).

For a long narrow room that had way too much going on before, it now feels like a comfy cozy family room. Now we will just have to see how long before she wants to switch things up again!

Wednesday, October 5, 2011

I heart envelope pillow covers

I know I have said it a lot...
but these are the easiest and best pillow covers ever!

I love pillows.
I hate storing pillows.
I hate stuffing pillows.
I hate putting in zippers.
I love that I can make pillow covers that solve all those problems...

I just took off the previous envelope pillow cover.
Used some extra white fabric I had on hand with some
"spooky fabric" (as little D calls it)

(yeah, I own an iron...I just don't like to use it).

And you have Halloween pillows.
(actually I made 2)

I'm thinking I might make a skeleton one with buttons...
similar to this.

Wednesday, July 20, 2011

Nursery wall art

I love the stripes in the nursery...but it has left me with 2 big walls of stripes that need to be broken up and filled with some fun art/pictures.

Project #1:
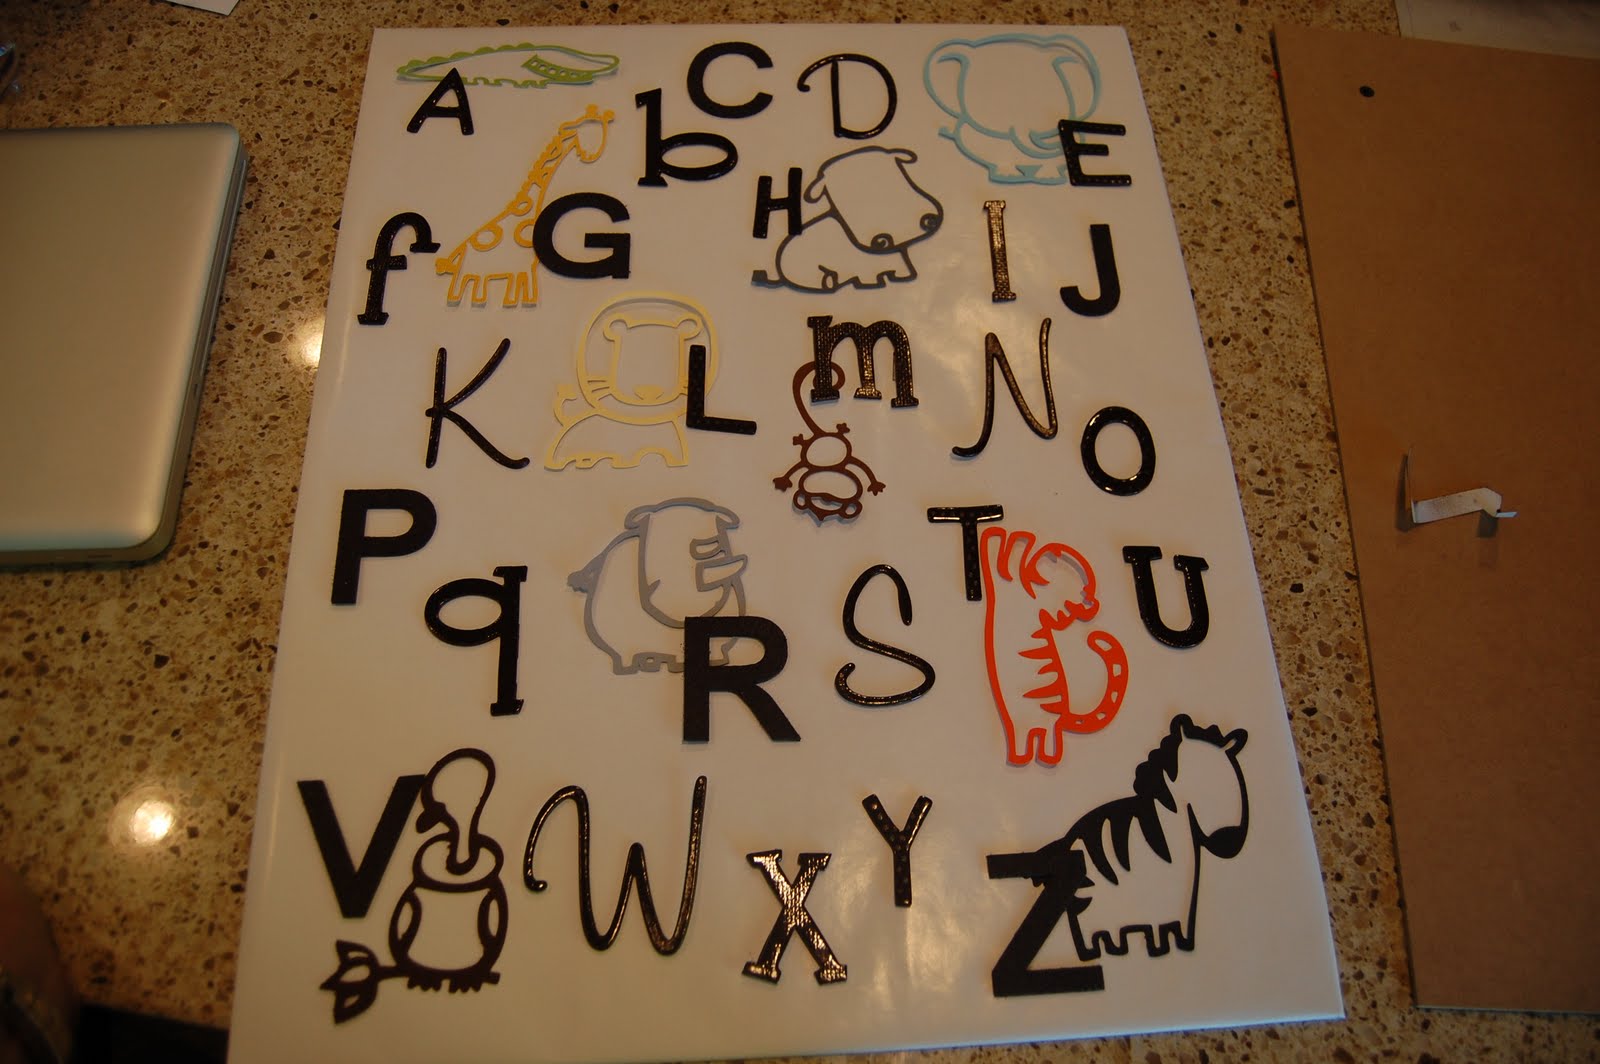
animal alphabet collage

I had everything for this project except some white paper for the backing, so I spent $1 on a roll of white wrapping paper and spray glued it to the backing of the frame...that's it!

Then I took some chip board letters leftover from this project and laid them out on the wrapping paper.

Then I cut out safari animals using my cricut and zooballo cartridge...just their silhouette...and put them next to their appropriate letter.

I spray painted the letters and frame brown and then glued everything on the paper...

and put it all together.


Project #2:
Pregnancy pictures shadow box.

I bought a shadow box at Joanns for 1/2 price and spray painted it brown. Then I put self adhesive corkboard on the back of the frame and covered it in white fabric.
Using the button straight pins, I put together a collage of pregnancy pictures and ultrasound pictures.


After little baby boy's baby blessing, I will change out this shadow box with his blessing outfit, like I did with Lil D.

Project #3:

I saw these frames at Shanty 2 Chic and I knew they were the perfect way to round out my wall of art/pictures. I bought 3 frames at Walmart for $3 a piece and spray painted them brown. I spray glued the leftover fabric from the nursery pillows to the glass and then hot glued the spray painted clips to each frame.

I decided to put pics of Lil D helping with the nursery makeover in the frames for now...sooner then later, we can put little baby boy's face in those frames.


After lots of spray paint, glue and nails...
Here it is...my nursery wall o' art and pictures.

The blank space will be filled with little baby boy's initial once he is here and has a name. And the other blank frame will hold his monthly pictures. I think it will be fun to watch it fill up each month.

I LOVE how it turned out.

Saturday, July 16, 2011

More pillows

After making the pillows for the baby room, Lil D decided that he needed a few more pillows for his window seat...with dinosaurs of course.

I still had 2 more pillow case covers from Ikea, so we went on a hunt for the perfect fabric. Lil D informed me that we would be making a brachiasaurus, which is blue and a "platicus", which is green (I'm not sure which dino that actually is, but Dino Dan says it's one:)

We went to a few fabric stores and I struggled to find blue and green fabric that I liked, would work for a dinosaur and didn't look really "babyish". I bought two quarter fats, and then kept putting off making them, because I didn't love the fabric. Then the other day, Lil D and I were walking through Walmart and lo and behold...the perfect dino fabric...


who would have thought...Walmart:)
I used my zooballo cricut cartridge and some heat n bond to make iron ons...
and just ironed on the dinos.


I think they turned out simple, but super cute. Lil D loves them, which is really all that matters...and I love that if he changes his love of dinosaurs to something else, I can just pull them off and use the pillow covers for something else.

And as long as I was doing pillows today...why not finally take the cloth napkins I bought at Target over a year ago and make that yellow pillow I have been wanting.


I do love a simple envelope pillow cover!

I think I am finally pillowed out!
On to finishing the picture wall for the nursery...it's turning out so cute!

Wednesday, June 29, 2011

The window seat is ready to be sat on.

With the pillows made and the seat cushion done and the valance hung...
Lil D was ready to put some more things in the baby room.


One more corner of the room complete.

All that is left is some decor on the walls.
Can't wait to post pictures of it all done...or maybe I just can't wait for it to be all done!

Tuesday, June 28, 2011

A little chocolate for the baby room.

I wanted to make a simple valance for the baby room.
I found this brown corduroy at Joanns at 50% off and thought it would be not just a great color but I really liked the texture.

I had some extra fabric, so I made an envelope pillow cover and added a little elephant to the corner.

I cut the elephant out with my cricut using the Zooballoo cartridge.
(I use ultra heat n bond to adhere the fabric)

Then I recovered the previous bench seat cushion with this great soft brown fabric that I also got at 50% off. It really is so soft and heavy and I love it.

Getting closer to being done...and loving everything in this room.

Monday, June 27, 2011

Pillows for the baby room.

I know that my nursery theme is elephants (as chosen by Lil D)...
but I wanted to make some ABC 123 pillows that will carry over when this little guy grows out of his nursery.


The pillow covers are from Ikea. An awesome trick my cousin taught me. Buy the Ikea pillow covers for very cheap, and then add anything that you want to them.
That is my kind of sewing.


As I do with most of my projects like this, I adhered the fabric to ultra heat n bond then cut out the letters with my cricut. These letters are from the Mickey Mouse cartridge. Then I iron them on and stitch around the outsides to secure them.

Only a few more projects and this baby room will be ready for a baby.

Wednesday, June 22, 2011

For the love of dinosaurs

Lil D is only 4 and his room has just undergone it's 3rd makeover...
I think we are done (for now:)
His nursery was painted light blue on top and chocolate brown on the bottom and we added a chair rail at the height of the window. I made the blue and brown valance. My mom made the large cushion for the window seat. His bedding was monkey themed, so we had monkeys around the room.


When Lil D turned 2 we moved him into a big boy bed. We bought the headboard off of craig's list for about $20. The dresser we already had. You can see their makeovers here.
I took down the monkey stuff and we added some cars. The main colors of his nursery were blue and brown...so we added some lime green and orange. I found the bedding at Target.


2 years later...and it was time for another update. Mostly I needed to get rid of the shelving on the walls. Mr. Active was bound to knock them off at some point. So I removed everything from the walls, patched the holes and gave the blue a new coat of paint.

Then we added dinosaurs...'cause Dino Dan has brainwashed my child...and taught him A LOT!

The main changes are just in the decor...details are listed below.


Details:

-The first change was removing the closet doors and hanging curtains (from Target), which allowed more space at the end of his bed where we added change #2...a bookshelf...(also from Target). Then bins are from Home Depot.

-I bought the magnet board at The Wood Connection and hung it with green grosgrain ribbon. I bought some little toy dinos at Joanns and glued magnets to them so he could hang "his stuff" as he requested.

-I cut out the vinyl dinosaurs using this cricut cartridge. Lil D HAD to pick out the colors and which dinosaurs we would cut out...he had a lot of opinions about this part. Lucky for me the colors he chose are the colors of his room:)

-The dinosaur pics I took at Utah's Hogle zoo...they are part of their "Zoorassic" summer exhibit. Lil D HATED them in person, but LOVES the pictures of them. They are 12X12 (printed at Costco) and mounted to white foam board. I wanted to just see the pics and I wanted to mount them without putting holes in my walls so I used some reusable sticky mounting squares.

-The picture wall. I bought the white frames from a thrift store (they weren't white) and painted them white. I bought the shadow box frame at Joanns (which holds his blessing outfit, including the slippers made by my mom) and I bought the other frame from Roberts Arts and Crafts. It is actually for school pics from 1st grade on up...but I used it for the monthly pics I took of Lil D his first year of life. The letters for his name I made shortly after he was born (from The Wood Connection) and I mounted them using the 3M velcro strips.

Other items that were made previously, but we are still using:


***his room got new baseboards and carpet like the rest of the house. I also bought a black out cellular shade from Lowes...it works great!

We are loving the new look and all those silly dinosaurs!


Related Posts with Thumbnails