Showing posts with label crafts. Show all posts

Friday, February 3, 2012

Hugs and Kisses from my Lil D

I got Lil D to do some finger painting for me.
This is a BIG thing for both of us.
For me...finger painting is messy...I don't like messes.
For D...finger painting is messy...he doesn't like to be messy.
Yep...he's like me:)

I cut out a vinyl saying on my cricut
and stuck it to a white 12X12 piece of cardstock.
and then I let him go to work.
It took him a minute...but he got into it.

And it turned out cute!

I'll have you know that as soon as he was done he went straight to the bathroom to wash up. I'm not sure he'll be asking to finger paint again any time soon...but for this project, it was a huge success.

Thursday, February 2, 2012

Heart Runner

I needed a little something for the side table/book shelf in my living room.
I found this great red table runner at Target but it was $20.
I wasn't willing to spend $20 for something that I didn't LOVE and I would probably not want anymore in a year or so....

....So....

I made a little red table runner myself.

I cut out a heart...

Then traced it on some red felt that I had from this project and this project.
I overlapped the heart tracing it 4 times.


Then cut it out...


and added a little decor.

Free...love free!

Thursday, December 15, 2011

homemade Christmas Gift #5 (2011)


.ornaments.

I saw these cute ornaments on Pinterest and made them with my activity day girls.
They turned out cute.
I didn't have puff paint, so we used regular paint and gold glitter glue.
The girls had fun and that's what matters most.

I also decided to do handprint ornaments of the boys.
Well...trying to get a 3 month old to open his hand long enough to get a print on an ornament is a joke. Awake...asleep...happy...screaming, it just wasn't going to happen.

So a footprint had to work...on vellum...that I could slide inside.

Lil D did a handprint...but his big hand is hard to capture on camera...

You get the idea...grandparents will love them!

Thursday, December 1, 2011

Homemade Christmas Gift #1 (2011)

Beadboard frames

We had some leftover beadboard from the nursery makeover.
I saw these cute beadboard frames at quilted bear and knew it was the perfect way to use it up.
Mr. T cut me a few different sizes.
The above long one holds 2 8X10s. We also cut one that holds 1 8X10 and one that holds 1 12X12. I painted them black using leftover paint from the guest bedroom furniture.
Mr. T also cut the plexi-glass. I had him cut it big enough to leave a 1/2inch border around the picture and small enough to leave a nice border of the beadboard.

He also drilled holes to run ribbon through to make it easy to hang.

I attached the plexi to the beadboard using acorn screws and bolts.

I absolutely LOVE them.
I kept a long one for myself...

The total cost for each frame was about $4.00

Beadboard: already had
Paint: already had
Nuts and bolts: $6.00 for 100 of each
(at a little shop called Nuts and bolts...at Lowes they would have been $1.00 for 4 nuts)
Plexiglass: $3.00 per frame.
(we bought a few large sheets because I was making so many which cut the cost on buying the precut little pieces.)
Ribbon: about $1.00 per frame

Wednesday, October 19, 2011

Button...Button...who's got the button?

My super talented cousin Hannah made a really cute pillow over a year ago.
I kept telling her I wanted to make one just like it.
Then she made another cute one for Christmas.
Again...
Well, just add it to the list.

So.
I was determined to have a button pillow.

And button pillow I made.

Spooky Style!

(if you couldn't guess...I stitched those puppies onto an envelope pillow case)


Can I just say...I will NEVER sew that many buttons onto one thing again.

Brain Damage!

But spooky nonetheless!

Tuesday, August 2, 2011

baby item #1...pacifier clip

Since the nursery is done...it's time to make a few baby items...non baby room related.
Today I whipped up a couple pacifier clips. Seriously...so easy and so fast.
I used this tutorial from Our Seven Dwarfs...but made it even easier for myself.

I cut each ribbon 9" long.
I burnt each end with a lighter to keep the ribbon from fraying.
I put the ribbon through the suspender clip and hot glued it down.
Then I hot glued one side of the velcro to the end of the ribbon...put a pacifier in to make sure it fit, and hot glued the other side of the velcro in the correct place.
Attach pacifier and it's ready for baby's mouth.


One project down...a few more to go...and 5 weeks left! :)

Wednesday, July 20, 2011

Nursery wall art

I love the stripes in the nursery...but it has left me with 2 big walls of stripes that need to be broken up and filled with some fun art/pictures.

Project #1:
animal alphabet collage

I had everything for this project except some white paper for the backing, so I spent $1 on a roll of white wrapping paper and spray glued it to the backing of the frame...that's it!

Then I took some chip board letters leftover from this project and laid them out on the wrapping paper.

Then I cut out safari animals using my cricut and zooballo cartridge...just their silhouette...and put them next to their appropriate letter.

I spray painted the letters and frame brown and then glued everything on the paper...

and put it all together.


Project #2:
Pregnancy pictures shadow box.

I bought a shadow box at Joanns for 1/2 price and spray painted it brown. Then I put self adhesive corkboard on the back of the frame and covered it in white fabric.
Using the button straight pins, I put together a collage of pregnancy pictures and ultrasound pictures.


After little baby boy's baby blessing, I will change out this shadow box with his blessing outfit, like I did with Lil D.

Project #3:

I saw these frames at Shanty 2 Chic and I knew they were the perfect way to round out my wall of art/pictures. I bought 3 frames at Walmart for $3 a piece and spray painted them brown. I spray glued the leftover fabric from the nursery pillows to the glass and then hot glued the spray painted clips to each frame.

I decided to put pics of Lil D helping with the nursery makeover in the frames for now...sooner then later, we can put little baby boy's face in those frames.


After lots of spray paint, glue and nails...
Here it is...my nursery wall o' art and pictures.

The blank space will be filled with little baby boy's initial once he is here and has a name. And the other blank frame will hold his monthly pictures. I think it will be fun to watch it fill up each month.

I LOVE how it turned out.

Tuesday, July 19, 2011

button straight pins

While working on one of my projects for my nursery wall art, I saw some super cute straight pins that had buttons as the heads. Bingo...just what I needed...

to make:

I took some straight pins and green buttons I already had,
and hot glued them together.


Cute!

Sunday, July 3, 2011

Some 4th of July goodness.

I have been wanting to make white chocolate covered popcorn for a long while...I found a great recipe that needed to be tried...and I figured I could make it 4th of July-y and make up a few neighbor treats.

I changed the recipe a bit, to fit our family and what we like, and to keep it as white with red and blue as possible.


2 bags buttered popcorn
1 bag white chocolate covered pretzels
1 bag white chips
1/2 bag mini marshmallows
1 1/2 cups m&ms
(I bought some 4th of July colors when we were in Vegas last week)

Pop the popcorn and separate any duds.
Smash the pretzels up a bit.
Melt the white chips and pour over the popcorn and mix well.
Add in remaining ingredients and mix some more.
Dump onto 2 cookie sheets and let it cool completely.


I had these little metal tins from a BBQ (Target $1 bins) and lined them with plastic wrap and then filled them up with the yummy popcorn mix.
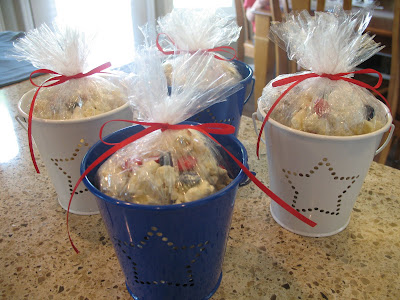


They are SO good!
and really...you can make this any time of year:)

********************************

I really like making Lil D shirts...give me an excuse...and I'll make one.
I got this t-shirt at Walmart for $2.50 and decided it would be perfect for a 4th of July shirt.

I used some more of my freezer paper (I really think this stuff will last till he's 18).
I traced a star cookie cutter and painted it on.


Then I taped off 1 inch stripes for the white.


and then 1 inch stripes for the red.


Of course Lil D loves to help.


and we have a patriotic shirt to wear to the parade.


Hope you all have a happy 4th of July!

Wednesday, April 20, 2011

sister Easter basket exchange

Last year my mom thought it would be fun to exchange "Easter baskets" among the sisters. There are 5 of us, plus my mom and 1 wonderful sister-in-law. It was a lot of fun...so this year we kept the tradition going.

This year I drew one of my younger sisters.
This is what I did...(our budget is $15...just a small amount to do something fun...it's even more fun to see what all you can do for $15)

She had seen a picture of these cute little guys from the Wood Connection and told my mom she loved them...so I painted up a set for her.

Then I found these great glass shapes at a scrapbook store (for 75 cents a piece) and knew they would be perfect...I really wanted to make one with her initial on it...and when I found this S pattern in my scrapbook paper stack I was thrilled...and I just love the colors in the paisley...she can wear it with so many things.

I just modge podged the paper to the back, then added the the bails with diamond glaze. I only bought 1 chain to keep my cost on budget, but she can easily switch the 2 pendants.

All packaged up and ready to go.


My total cost for all I bought was just under $15. I didn't have to buy any paint, paper or supplies to make the stuff which was great. I hope she loves it all.

My mom has me this year and I can't wait to see what she came up with...she is crazy creative and crafty, so I am very excited!

Tuesday, March 29, 2011

My "Lil" D turns 4 tomorrow...maybe:)

For the past few months Lil D has informed me that he doesn't want to turn 4. He was so excited to turn 3...he loved everything 3...and I think he is having a hard time giving that up. I finally gave up trying to convince him that 4 was cool and told him he could stay 3.

This was today's conversation:

D: Is tomorrow really my birthday?
Me: yep...but it's not your birthday party...just your birthday.
D: When's my party?
Me: On Saturday.
D: That's a long way.
Me: No, it's only a few days.
D: Why is tomorrow my birthday?
Me: because it was the day you were born.
D: Why do I have to turn 4?
Me: You don't have to, you can stay 3 if you want to.
D: Mom....it's my birthday, that means that I have to turn 4.
(to true little man, to true)

For his birthday, I made him a little t-shirt.
(Thank you cricut, freezer paper and Walmart's $4 t-shirts.)


And a birthday "sign" for the front room table.
(He actually helped me paint all the blocks green....he really loves to "help")


(block and vinyl set purchased at The Wood Connection)

After he went to bed tonight, I put together the birthday table.


(please ignore my outdated family picture...yes, lil D is 10 months in that pic)
(and please ignore my off centered rectangle thing...since we rearranged the room, it no longer works and I haven't taken the time to change it...I'll explain later)

I am really excited for Lil D's party this Saturday. For the first time, he had a VERY strong opinion about what we needed to have at the party. It was pretty funny to take him to the party store to pick things out. He chose a "construction" theme and I have found some cool things to do and give the kids. I also found an awesome cake that I will be attempting to replicate. One of the cutest things about his upcoming party was that he wanted to write his friend's names on the invitations and when we delivered them, he had to go up to the door all by himself....love him! You can see him writing his invites here....he's pretty impressive.

I'll post pics of the party festivities this weekend!

Thursday, March 3, 2011

Photo Pendant

I bought some square pendants at hobby lobby awhile back. They were half off so I think I got 2 for like $1 or $2. I decided to make myself a little photo pendant with Lil D's face....'cause c'mon, he's so stinkin' cute.

Here are my supplies:
Diamond glaze (this stuff lasts forever)
a wallet size photo of Lil D, so his whole head will fit in the pendant
silver pendant

I cut the photo down to fit in the pendant. I think it's about 1" X 1".

Then I filled it with the diamond glaze.

and let it dry overnight.

Then I simply slid it on a silver chain I have and away I go!

These little pendants are so great. They come in a few shapes, and are really inexpensive. You can put just about anything in them...photos, flowers, words, a special date...
Love it!

Be sure to stop by tomorrow....
I am having a fantastic giveaway that you won't want to miss....
just think DRESSES!
Related Posts with Thumbnails